
Clicker Keypad Manual: A Comprehensive Guide
This manual provides detailed instructions for installing, programming, and maintaining your Clicker keypad, ensuring seamless operation with compatible garage door openers.
It covers troubleshooting common issues and exploring advanced features for optimal performance, offering a user-friendly experience for all homeowners.
Compatible with Chamberlain, LiftMaster, Craftsman, and Genie, this guide simplifies setup and maximizes convenience, enhancing your daily routine.
Downloadable manuals and resources are readily available online, supporting a smooth and efficient user experience with your Clicker keypad system.
What is a Clicker Keypad?
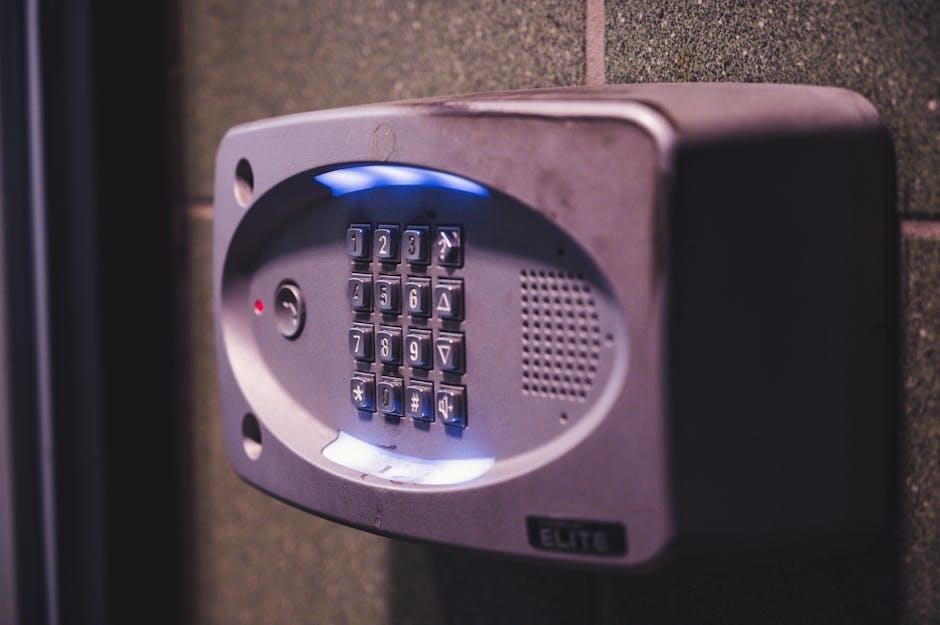
The Clicker keypad is a convenient, wireless access solution for your garage door, offering a secure and keyless entry experience. It mounts outside your garage, allowing authorized users to open and close the door using a personal identification number (PIN).
Serving as a fantastic complement to traditional remotes, the keypad is especially useful for situations where you might not want to carry a remote – think gardening, exercising, or simply when you’re coming home hands-full.
Highly compatible with a vast majority of garage door openers in North America, including major brands like Chamberlain, LiftMaster, Craftsman, and Genie, the Clicker keypad boasts universal frequency recognition.
Its easy-to-follow wireless programming ensures a quick setup, typically taking just seconds to complete, and it often comes equipped with a 9V battery and a comprehensive instruction manual for effortless installation and operation.
Keypad Compatibility: Brands and Models
The Original Clicker keypad demonstrates exceptional compatibility, functioning seamlessly with over 90% of garage door openers currently installed across North America. This broad compatibility encompasses leading brands such as Chamberlain, LiftMaster, Craftsman, and Genie, providing a versatile access solution for numerous homeowners.
Specific models known to work well include the LiftMaster 8550W and various Craftsman models like CMX3. However, verifying compatibility with your specific opener is crucial.
Downloading the appropriate manual, linked via resources like widencdn.net, allows you to match your opener’s ID to the keypad for optimal programming.
While generally universal, some older or less common brands might require specific programming procedures or adapters. Always consult the Clicker documentation or manufacturer’s support for detailed compatibility information before purchasing.
Understanding the Keypad Display and Buttons
The Clicker keypad features a simple, user-friendly interface designed for easy operation. Typically, it includes a numeric keypad (0-9) for entering your personal identification number (PIN), and a dedicated “Learn” or “Program” button to initiate the pairing process with your garage door opener.
Most models utilize two Light Emitting Diodes (LEDs) to provide visual feedback. These LEDs communicate the keypad’s status – for example, flashing purple indicates successful pairing or programming mode. Constant blinking often signals an issue, like a low battery.
The ‘0’ key often serves a dual purpose, confirming PIN entry and completing programming sequences. Understanding the LED patterns and button functions is key to successful setup and troubleshooting.
Refer to your specific model’s manual for detailed explanations of all indicators and controls.

Installation and Setup
Proper installation ensures reliable operation. Mount the keypad near your garage door, following included instructions, and then install the 9V battery for initial power-up.
Mounting the Keypad
Selecting a suitable location is crucial for optimal performance. The Clicker keypad should be mounted on a clean, dry surface near your garage door, ideally within range of the garage door opener. Avoid areas exposed to direct sunlight, extreme temperatures, or excessive moisture, as these conditions can affect functionality.
Securely attach the mounting bracket using the provided screws. Ensure the keypad is positioned at a comfortable height for easy access and visibility. The keypad should be firmly affixed to prevent accidental dislodgement. Consider the proximity to power sources and wiring to avoid potential interference or damage.
Double-check the alignment and stability of the mounted keypad before proceeding with the setup process. A properly mounted keypad contributes to reliable operation and long-term durability, enhancing the overall user experience.
Initial Power-Up and Battery Installation
Before initial use, ensure the Clicker keypad has a fresh 9V battery installed. Carefully open the battery compartment, typically located on the back of the keypad, and insert the battery, observing the correct polarity (+ and -) as indicated. A new battery is often included with your keypad for immediate use.
Once the battery is installed, the keypad should power up automatically, displaying a welcome message or initiating a self-test sequence. If the keypad doesn’t power on, double-check the battery installation and ensure it’s securely connected. A weak or improperly installed battery can cause operational issues.
Verify the keypad’s functionality by pressing a few buttons to confirm the display lights up and responds to input. Proper battery installation is essential for reliable performance and successful programming of your Clicker keypad.

Programming the Keypad
Successfully programming your Clicker keypad involves entering a PIN, utilizing the learn button, or following brand-specific instructions for seamless garage door control.
Default PIN and Changing the PIN
The Clicker keypad typically arrives with a pre-set default PIN, often ‘0000’ or ‘1234’, allowing for immediate, albeit temporary, access to your garage door. However, for enhanced security, changing this default PIN is strongly recommended during the initial setup process. This simple alteration significantly reduces the risk of unauthorized access.
To modify the PIN, consult your specific keypad model’s instructions, as the procedure can vary slightly. Generally, it involves pressing a sequence of buttons – often the ‘#’ or ‘*’ key – followed by entering your desired new four-digit PIN, and then confirming it. Remember to choose a PIN that is easy for you to recall, but difficult for others to guess.
Keep your new PIN in a secure location, separate from the keypad itself, to prevent accidental loss or compromise. Regularly updating your PIN is also a prudent security measure, ensuring continued protection of your property.
Programming with the Learn Button (General Method)
The most common method for programming a Clicker keypad involves utilizing the “Learn” button located on your garage door opener motor unit. Begin by ensuring the opener is powered on. Locate the Learn button – it’s typically yellow or orange – and press it once, initiating a learning mode, usually indicated by a flashing light.
Within the specified timeframe (often 30 seconds), return to your Clicker keypad. Press and hold the ‘Program’ or ‘Learn’ button on the keypad until the garage door opener’s light flashes. Then, enter the four-digit PIN (or the default ID, like ‘2’ for Craftsman) and press the keypad’s ‘0’ key.
Successful programming is confirmed by the garage door opener lights illuminating, or a distinct audible signal. Test the keypad to verify functionality. If unsuccessful, repeat the process, ensuring proximity to the opener during programming.
Specific Programming for Craftsman Openers (Using ID 2)
Craftsman garage door openers often require a specific programming sequence utilizing the default ID of ‘2’. Begin by pressing the red “Learn” button on your Craftsman opener unit. The indicator light will illuminate, signaling the start of the programming mode.
Immediately after pressing the Learn button, on your Clicker keypad, enter the number ‘2’ followed by pressing and holding the keypad’s ‘Program’ or ‘Learn’ button until the garage door opener light blinks; This confirms the keypad is attempting to connect.
Release the keypad’s button and press it again. Both LEDs on the garage door opener should flash purple, indicating successful ID recognition. Test the keypad to ensure proper operation. If it fails, repeat the process, ensuring a clear line of sight and proximity to the opener.
Programming for LiftMaster Openers
LiftMaster openers utilize a slightly different programming procedure. First, locate the “Learn” button on the motor unit of your LiftMaster garage door opener – it’s typically purple or red. Press and release this button; the indicator lights will illuminate, signifying the opener is in learning mode.
Within thirty seconds, on your Clicker keypad, enter the four-digit PIN code (default is often 1234, but verify your specific model). Following the PIN entry, press and release the ‘0’ key on the keypad. Both LEDs on the opener will illuminate purple, confirming code acceptance.
Press the ‘0’ key again on the Clicker keypad. The garage door should now operate with the keypad. If unsuccessful, repeat the process, ensuring the keypad is within range and the opener isn’t already at its programming limit.

Troubleshooting Common Issues
Common problems include a non-responsive keypad or constant LED blinking, often resolved by a simple battery change and subsequent reprogramming of the device.
Keypad Not Responding
If your Clicker keypad fails to respond when buttons are pressed, the first step is to verify the battery. A depleted battery is a frequent cause of this issue, as evidenced by reports of restored functionality after replacement. Ensure the 9V battery is correctly installed, observing proper polarity.
If a new battery doesn’t resolve the problem, check for potential interference from other wireless devices. While Clicker keypads boast universal frequency recognition, strong signals can sometimes disrupt communication. Try temporarily disabling nearby devices to see if this restores keypad responsiveness.
Also, confirm that the keypad is within the operational range of your garage door opener. Excessive distance can weaken the signal. Finally, if the keypad remains unresponsive, a factory reset might be necessary to clear any corrupted programming, requiring subsequent reprogramming to your opener.
Constant Blinking of LEDs
A consistently blinking LED on your Clicker keypad often indicates a communication issue or a programming error. As reported by users, constant blinking when pressing any number frequently signals a low battery, even if the keypad appears to power on. Replacing the 9V battery is the initial troubleshooting step.
If the blinking persists after a battery change, it suggests a loss of programming or an inability to establish a connection with the garage door opener. Attempt to re-enter programming mode by following the manufacturer’s instructions, ensuring the correct PIN is used.
Verify compatibility with your opener’s ID code; Craftsman openers often require ID 2 during programming. If the LEDs continue to blink, a factory reset may be needed, followed by a complete reprogramming process.
Lost Programming – Resetting to Factory Defaults
If your Clicker keypad has lost its programming, or you’re experiencing persistent issues, resetting to factory defaults can resolve the problem. While a specific reset procedure isn’t universally detailed, a common solution involves removing the battery for an extended period – ideally several minutes – to clear the keypad’s memory.
After reinstalling the battery, the keypad should revert to its original, unprogrammed state. You’ll then need to reprogram it to your garage door opener, following the instructions specific to your opener’s brand (LiftMaster, Craftsman, etc.).
Remember to consult your garage door opener’s manual or the Clicker keypad’s documentation for precise programming steps, including the correct ID code and PIN entry sequence. This ensures a successful reconnection and restores functionality.

Advanced Features
Explore extended range and minimize interference for reliable operation, plus utilize the keypad with multiple garage doors for enhanced convenience and control.
Wireless Range and Interference
The Clicker keypad boasts a substantial wireless range, typically covering a significant distance from the garage door opener, ensuring reliable access. However, several factors can influence this range and potentially cause interference.
Metal objects, such as cars, filing cabinets, or even dense foliage, can obstruct the radio frequency (RF) signal, reducing the effective range. Similarly, other electronic devices operating on similar frequencies – including certain types of lighting, wireless routers, and even neighboring garage door openers – may contribute to interference.
To maximize range and minimize interference, position the keypad away from large metal obstructions and potential sources of RF noise. Experiment with different mounting locations to find the optimal signal strength. If interference persists, consider relocating your garage door opener or other interfering devices. Ensuring a clear line of sight between the keypad and the opener can also significantly improve performance.
Regularly check for updated firmware or software for both the keypad and opener, as manufacturers often release updates to address interference issues and enhance wireless communication.
Using the Keypad with Multiple Garage Doors
The Clicker keypad can be programmed to control multiple garage doors, offering convenient access to your entire property from a single location. However, this functionality requires compatible garage door openers and careful programming.
Each garage door must have a compatible opener capable of recognizing a unique code from the keypad. The programming process typically involves entering a specific code for each door, allowing the keypad to differentiate between them. Refer to the individual manuals for each garage door opener for specific programming instructions.
Some systems may require a separate receiver for each door, while others can handle multiple doors with a single receiver. Ensure your setup supports multi-door operation before attempting to program. When entering codes, double-check for accuracy to avoid confusion and ensure reliable operation.
Properly labeled doors and a well-documented programming setup will simplify management and prevent accidental activation of the wrong door.

Maintenance and Care
Regular battery replacements and gentle cleaning with a damp cloth ensure optimal keypad functionality and longevity, preserving reliable access to your garage.
Battery Replacement Guide

Replacing the battery in your Clicker keypad is a straightforward process, vital for continued operation. Begin by locating the battery compartment, typically on the back or side of the unit. Gently open the compartment, often requiring a small screwdriver or a similar tool, depending on the model.
Remove the old 9V battery, noting the correct polarity (+ and -) for proper installation. Insert the new 9V battery, ensuring it aligns with the marked polarity indicators within the compartment. Securely close the battery compartment cover, confirming it latches or screws shut properly.
After battery replacement, you may need to reprogram the keypad to your garage door opener, as changing the battery can sometimes clear the existing programming. Refer to the “Programming the Keypad” section of this manual for detailed instructions. Always dispose of used batteries responsibly, following local regulations for battery recycling.
Cleaning the Keypad
Maintaining a clean keypad ensures reliable performance and extends its lifespan. Regularly wipe the exterior surfaces with a soft, damp cloth to remove dust, dirt, and fingerprints. Avoid using abrasive cleaners, solvents, or harsh chemicals, as these can damage the keypad’s finish or internal components.
For stubborn grime, lightly dampen the cloth with a mild soap solution, ensuring it’s not overly wet. Gently wipe the affected areas, then rinse with a clean, damp cloth to remove any soap residue. Thoroughly dry the keypad with a soft, lint-free cloth before resuming use.
Pay particular attention to the buttons, ensuring they are free from debris that could impede their functionality. Avoid spraying liquids directly onto the keypad; always apply them to the cleaning cloth first. Regular cleaning contributes to a consistently responsive and user-friendly experience.
Safety Precautions

Always keep the keypad away from water and extreme temperatures. Ensure proper programming to prevent unauthorized access, and regularly test functionality for safe operation.
Important Safety Information
Prioritize safety during installation and operation of your Clicker keypad. Never allow children to operate the keypad or play near the garage door. Regularly inspect the keypad for damage, and discontinue use if any issues are detected.
Ensure the garage door is fully visible and unobstructed during operation. Avoid programming the keypad while the garage door is in motion. If the door malfunctions, immediately disconnect the opener and contact a qualified technician.
Be mindful of the wireless range and potential interference, as these factors can affect keypad functionality. Always test the keypad after programming to confirm proper operation. Keep the programming instructions readily available for future reference and potential reprogramming needs.
Remember, a malfunctioning keypad could compromise garage door security, so proactive maintenance and adherence to safety guidelines are crucial for a secure and reliable system.